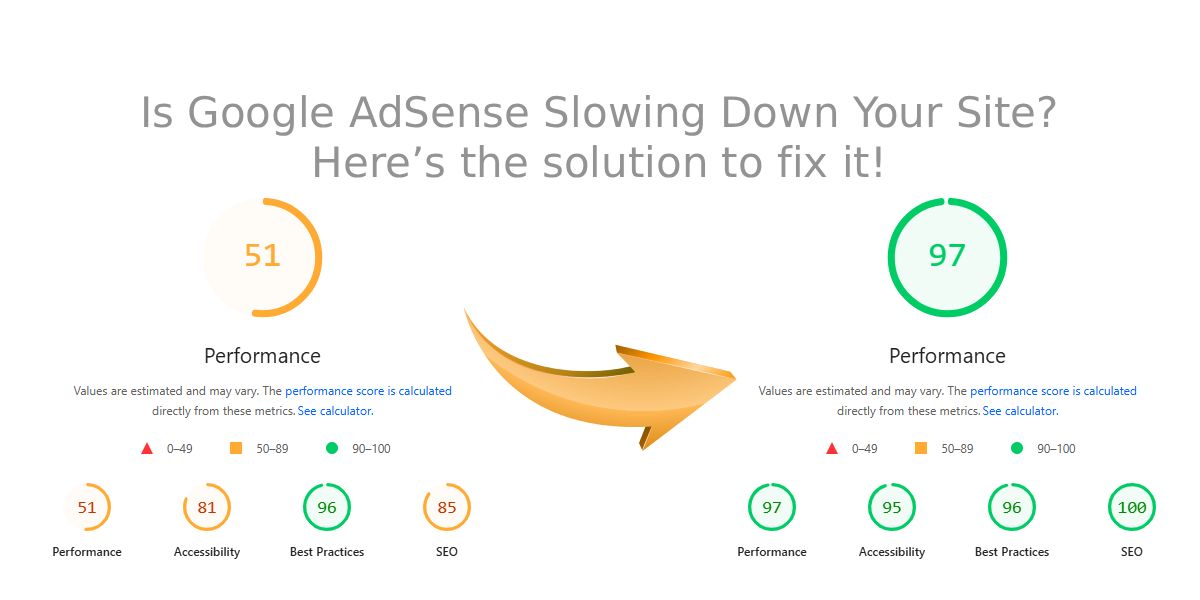
Is Google AdSense Slowing Down Your Site? Here’s the solution to fix it!
⚠️ Not beginner-friendly: This guide requires direct access to your website’s code (HTML templates and scripts). If you’re using a CMS or page builder without code access, this tutorial won’t apply. For developers and site owners who can edit source files, this solution will help you reduce site loading speed issues, fix high LCP, and load your website faster even with Google AdSense Auto Ads enabled.
🚨 Why Google AdSense Auto Ads Slow Down Your Website
Google AdSense Auto Ads automatically inserts ad placements across your site, analyzing your layout and injecting ad containers dynamically. While this system is convenient, it introduces serious performance bottlenecks that hurt your Core Web Vitals:
- Render-blocking scripts: AdSense injects JavaScript early in the page lifecycle, forcing the browser to wait before painting visible content.
- Network contention: Multiple requests to
googlesyndication.com,doubleclick.net, and other third-party servers compete with your CSS, fonts, and main scripts. - Layout shifts: Auto Ads can suddenly change the layout as they load, increasing Cumulative Layout Shift (CLS) and hurting user experience.
When your page loads, AdSense scripts are fetched before your hero image, styles, or main text are rendered delaying First Contentful Paint (FCP) and Largest Contentful Paint (LCP). In short, your visitors see a blank or partially loaded page for several seconds, and Google’s PageSpeed Insights punishes your score.
💡 The Solution: Delayed Script Loading
The idea is simple: we postpone loading all non-critical third-party scripts (like AdSense, Analytics, Tag Manager, and others) until after the user interacts with the page or a few seconds have passed. This ensures that:
- Your main content, CSS, and hero images load instantly.
- AdSense scripts load after your site is visually complete.
- Your Core Web Vitals improve drastically without losing ad revenue.
Here’s the complete JavaScript snippet you’ll need to insert near the end of your <body> tag:
function initDelayedScriptsLoader() {
  const AUTOLOAD_DELAY_MS = 5000;
  const USER_EVENTS = [
    "keydown",
    "mousemove",
    "wheel",
    "touchstart",
    "touchend",
  ];

  let loaded = false;
  const timerId = setTimeout(loadDelayedScripts, AUTOLOAD_DELAY_MS);

  USER_EVENTS.forEach((evt) => {
    window.addEventListener(evt, triggerLoad, { passive: true, once: true });
  });

  function triggerLoad() {
    if (loaded) return;
    clearTimeout(timerId);
    loadDelayedScripts();
  }

  function loadDelayedScripts() {
    if (loaded) return;
    loaded = true;

    USER_EVENTS.forEach((evt) => {
      window.removeEventListener(evt, triggerLoad, { passive: true });
    });

    document.querySelectorAll("script[data-delay]").forEach((origTag) => {
      const src = origTag.getAttribute("data-delay");
      if (!src) return;

      const newTag = document.createElement("script");
      newTag.src = src;

      if (origTag.hasAttribute("async")) {
        newTag.async = true;
      } else if (origTag.hasAttribute("defer")) {
        newTag.defer = true;
      } else {
        newTag.async = true;
      }

      if (origTag.type && origTag.type !== "text/javascript") {
        newTag.type = origTag.type;
      }

      for (const { name, value } of [...origTag.attributes]) {
        if (name.startsWith("data-") && name !== "data-delay") {
          newTag.setAttribute(name, value);
        }
      }

      origTag.parentNode.insertBefore(newTag, origTag);
      origTag.remove();
    });
  }
}

initDelayedScriptsLoader();
⚙️ How to Use It
After including the function above, replace your existing Google AdSense or third-party script tags with data-delay attributes instead of the normal src. Here’s an example setup:
<\script
  data-delay="https://pagead2.googlesyndication.com/pagead/js/adsbygoogle.js?client=ca-pub-0000000000000000"
  async
  crossorigin="anonymous">
<\/script>

<\script
  data-delay="https://www.googletagmanager.com/gtag/js?id=G-0000000000"
  async>
<\/script>

<\script data-delay-inline="ga-init">
  window.dataLayer = window.dataLayer || [];
  function gtag(){ dataLayer.push(arguments); }
  gtag('js', new Date());
  gtag('config', 'G-0000000000');
<\/script>
The initDelayedScriptsLoader() function will automatically load these scripts 5 seconds after the user arrives, or sooner if the user interacts (scrolls, clicks, moves the mouse, etc.). This makes your page interactive and visible immediately improving LCP and FCP by several points.
🧠 How It Works (Technical Explanation)
- Creates a timer: It waits for 5 seconds after page load.
- Listens for user interaction: Mouse movement, key press, or scroll cancels the timer and loads scripts early.
- Finds all delayed scripts: The function looks for
<script data-delay>tags. - Recreates real script tags: When triggered, it converts them into standard
<script src>tags and inserts them back into the DOM. - Removes placeholders: The old tags are removed to keep your markup clean.
Because your main thread is now free during the initial render, your HTML, CSS, and above-the-fold images load instantly. Once your visitor starts interacting or 5 seconds pass, the non-critical scripts (like Google Ads or Analytics) are fetched in the background completely invisible to the user.
🚀 Results You Can Expect
- Faster First Contentful Paint (FCP): Your core layout loads 30–60% faster.
- Improved Largest Contentful Paint (LCP): Hero images and headings appear immediately.
- Stable layout (low CLS): Ads no longer push content down mid-load.
- Better user experience: Your visitors interact faster, and bounce rates drop.
🎯 Bonus Tips for Even Better Speed
- Lazy-load all images below the fold using
loading="lazy". - Set a
min-heightfor ad containers to prevent layout shifts. - Defer custom JavaScript and tracking pixels the same way.
- Combine this with a caching or CDN strategy to maximize gains.
✅ Conclusion
Google AdSense Auto Ads can tank your site speed if loaded too early, increasing your LCP and FCP times significantly. By implementing the delayed script loader shown above, you tell the browser to prioritize visible content first then fetch ads and analytics only after the visitor engages. This approach helps reduce site loading speed problems, fix high LCP scores, and ultimately make your website load faster while keeping monetization intact.
💬 Try implementing this code on your site and test your results in Google PageSpeed Insights you’ll be surprised how much your metrics improve!
📦 Fork This Project on GitHub
Want to contribute, customize, or self-host the delayed loader? The full source code is open and MIT-licensed fork it, star it, and make it your own.
If you liked this article, you can fuel more guides like this ☕
Your support helps me keep publishing deep-dive performance tutorials and tools. Every coffee powers more testing, code samples, and free resources.